Dia Digitalisierung Slide digitising
Von 1975 bis 2014 wuchs meine Dia-Sammlung auf etwa 1400 Dias an die in 50er Magazinen gespeichert waren. Nur selten wurden sie mit einem Diaprojektor projiziert und auf einer Leinwand angeschaut. From 1975 bis 2014 my slide collection had grown to about 1400 slides stored in magazines holding 50 slides each. Only rarely were they looked at while being projected onto a linen cloth by a slide projector.
In 2014 kaufte ich meine erste DSLR. Mit Hilfe dieser EOS 70D und dem TAMRON Makro-Objektiv (siehe Übersicht) habe ich meine Dias digitalisiert. Dazu habe ich die Optik in meinem Diaprojektor durch eine Mattscheibe ersetzt. Auf einem Holzbrett habe ich einen Makro-Schlitten befestigt, die EOS 70D darauf montiert und direkt vor dem Ausgang des Projektors platziert. Dann habe ich die Dias in 50er Wechsel-Magazinen projiziert und mit Fernauslösung der Kamera photographiert. Das Photographieren der Dias eines Magazin dauerte nur wenige Minuten. Die meiste Zeit verbrachte ich mit dem Reinigen der Dias von Staub, dem Umdrehen in die aufrechte Position und der Rotation the 'Portrait' Photos in die 'Landscape' Orientierung. In 2014 I bought my first DSLR. Using this EOS 70D and the TAMROM Macro lens (see Overview) I digitised my slides. For this I replaced the optics of the slide projector by a diffusing screen. I screwed a camera rail to a wooden plate and mounted the EOS 70D onto this rail oriented opposite to the exit of the projector and directly in front of it. I projected the slides in the exchange magazines for 50 slides and photographed them with remote shooting. Taking the images for one magazine only took a few minutes. Most of the time I spent in cleaning the slides from dust, flipping them over to the top up orientation and rotating the portrait photos into the landscape orientation.
Nach einigem Optimieren von Belichtung und Abstand wurden alle Photos mit den folgenden Einstellungen aufgenommen: 1/80s | F11 | ISO 100, was eine Schärfentiefe von etwa 4mm ergibt. Die Bilder wurden im RAW und JPEG Format abgespeichert. Der mit manuellem Fokus eingestellte Abstand betrug 33cm, so dass das Dia formatfüllend aufgenommen wurde und kein nachfolgendes Zuschneiden nötig war. After optimising for exposure and distance, all photos were taken with the following exposure: 1/80s | F11 | ISO 100, which gives about 4mm depth of field. Images were stored as RAW and JPEG files. With manual focus the distance was adjusted to 33cm such that the image filled the full frame and no subsequent croping was needed.
Mit den Programmen darktable und Topaz Photo AI habe ich mich 2025 an die Bearbeitung der RAW Bilder gemacht. Zuerst wurden die Photos in darktable entwickelt, dann habe ich mit Photo AI entrauscht, geschärft und auch die Staubentfernung ausprobiert. Die erzielten Ergebnisse für einige Beispiele werden unten gesammelt. Using the programs darktable and Topaz Photo AI, I started developing the RAW images in 2025. Firstly, the photo was developed in darktable, subsequently I used Photo AI for denoising, sharpening and also experimented with the dust removal. The results for a few examples will be collected below.
Monument Valley Monument Valley
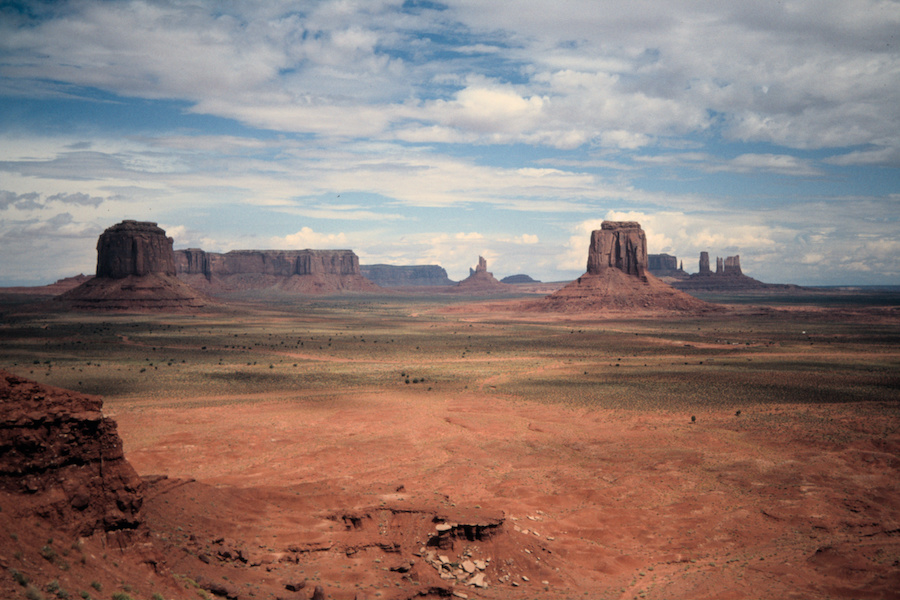


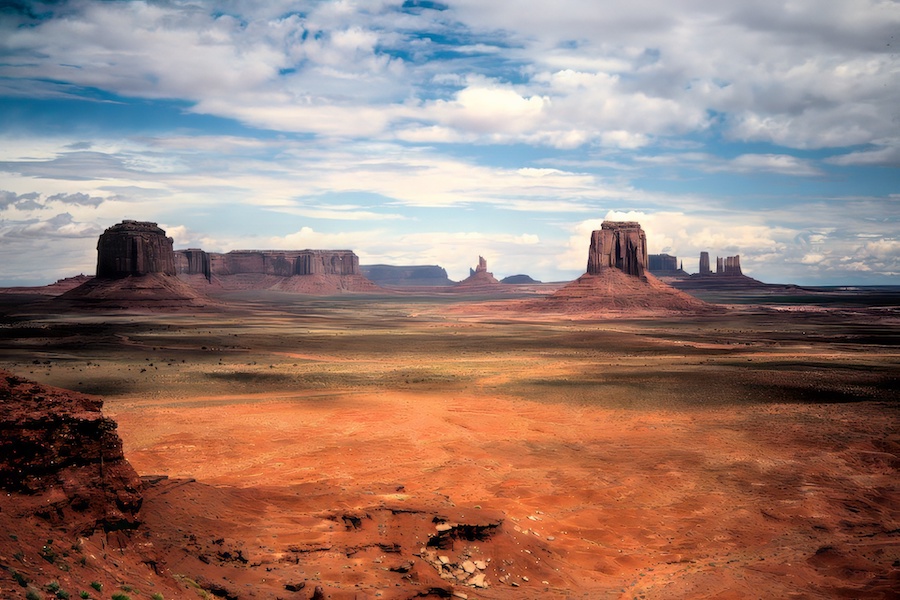
Das erste Beispiel ist ein Photo des Monument Valleys in Arizona und Utah, USA aus dem Sommer 1992. Das Original wurde mit der EOS 100 und dem EF 28-80mm aufgenommen. Die verschieden Versionen sind: das 'Original', i.e. das in JPEG konvertiert RAW file; das Photo nach der Entwicklung mit 'darktable'; sowie nach den verschiedenen Schritten mit Photo AI erst 'Entrauschen'; plus 'Schärfen'; plus 'Staubentfernung'. The first example is an image of Monument Valley in Arizona und Utah, USA from summer 1992. The various versions are: the 'Original', i.e. the RAW file converted into JPEG; the result after developing with darktable; after using Photo AI for 'Denoise'; plus 'Sharpen'; plus 'Dust removal'.
Wie alle RAW files ist das Original kontrastarm mit eher soften Farben. Nach darktable ist der Kontrast erhöht und die Farben sind natürlicher. Das Rauschen im Himmel ist klar sichtbar und lässt sich durch Photo AI gut unterdrücken. Nach dem Schärfen sind die Berge wesentlich plastischer. Die Staubentfernung erkennt den Flusen oberhalb des vorderen großen flachen Tafelbergs und entfernt ihn. Allerdings werden auch Teile der Vegatation im Vordergrund als Staub interpretiert und beseitigt. Dadurch wirkt das Bild am Ende etwas zu soft. As all RAW files the original has low contrast and somewhat soft colors. After processing it with darktable there is more contrast and more natural colors. The noise in the sky is clearly visible and can be effciently reduced by Photo AI. After sharpening the mountains are much more three-dimensional. The dust removal finds the dust particle on top of the more close flattop mountain and removes it. However, it also interprets some of the vegatation in the foreground as dust and removes them. With this the final image appears a bit too soft.

Der Vergleich links zeigt den Unterschied zwischen dem Original und dem entwickelten Bild nach allen Schritten in darktable und Photo AI. Schlussendlich hat die Entwicklung dieses Photos eine 33 jährige Geschichte, etwas was ich mir nie hätte träumen lassen als ich das Photo im Jahr 1992 gemacht habe. The comparison on the lefts shows the original photo and the end result of the development in darktable and Photo AI. Finally, this image has a development history of 33 years, something I had never imagined when taking the shot in 1992.